There are some notable new features in the latest version of Mac OS X – for example a new version of Safari, iCloud Keychain, and a whole host of memory, performance and power improvements (such as App Nap and Compressed Memory). However, the feature that you’re most likely to use every day and get the most out of, is probably Tags.
What are Tags?
Apple obviously believes that organising your files into folders is a bit old-hat. After all, it does take some effort to keep organised and create an easy-to-use structure that helps you remember where you left important documents. With Mavericks, you can use metadata (that’s basically information that describes data!) to organise your files in a much more efficient and powerful way. For example, you might want to tag all your electronic receipts or company documents, or perhaps you’re working on a special project that needs to be marked as important. As another example – you might choose to tag all your invoices with the Tag “Invoices” and unpaid ones “Unpaid Invoices” – meaning that you can instantly see (wherever they are actually saved) the ones that need attention.
The new Tags feature is a vast improvement (and long overdue) on the old “labels” feature available in previous versions of OS X. The concept however is quite similar – you can assign a custom “Tag” to any file or folder (including iCloud items like Pages and presentations) that help you view and organise your files. However, whereas labels was just a simple visual aid to highlight any item with a colour in Finder, Tags are much more powerful and can actually be used to when you search for items on your Mac. Furthermore, you can add multiple tags to an item – so you’re not limited to one category when describing what it is.
Let’s play Tag…
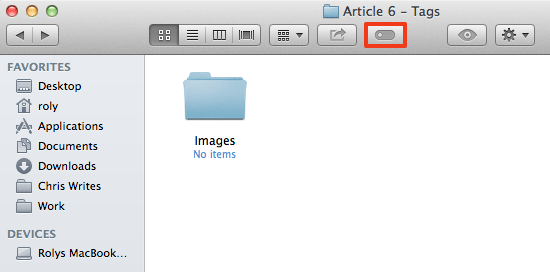
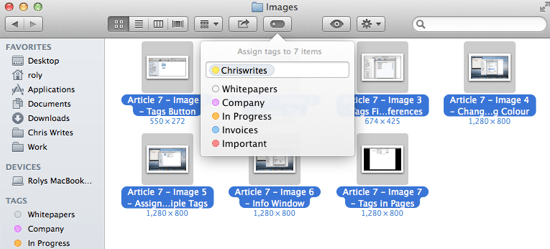
To get going with Tags, open a new Finder window and browse to any file or folder on your Mac. With the item selected, click the Tags button that appears at the top of the Finder toolbar.
A popup window then appears – to add a new Tag, just start typing the name of the Tag that you want to create. In this example I’ve created a new Tag called “Chriswrites”. Hit Enter to actually assign the Tag to the selected item.
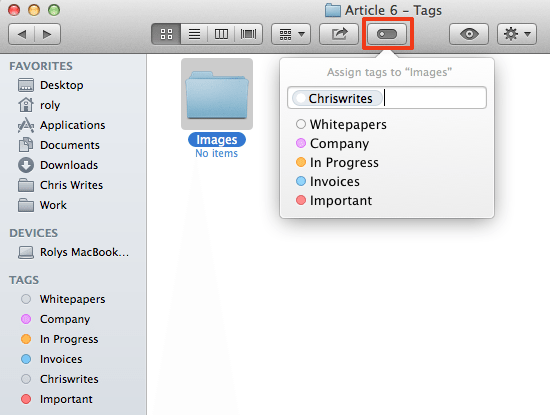
You’ll notice that nothing much has changed in the Finder window because we haven’t yet assigned a colour to the new tag. However, in the Finder sidebar, the new tag name you’ve just created should now be visible – in this case “Chriswrites” (along with several other tags I’ve already created and applied to items on my Mac and iCloud).
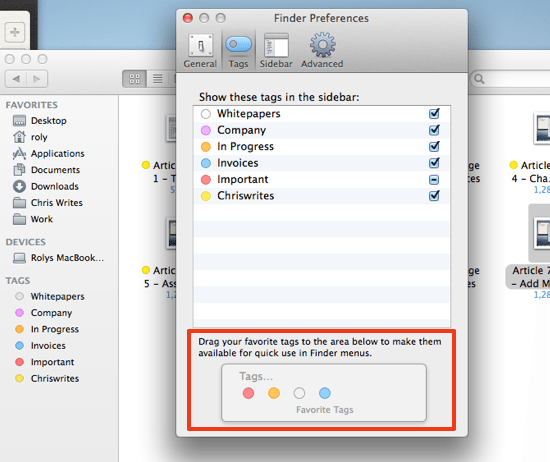
By default, new tags you create are not assigned any particular colour. To change that, with the Finder window still open, choose Preferences from the Finder menu (or just use Cmd-comma) and then the Tags tab.
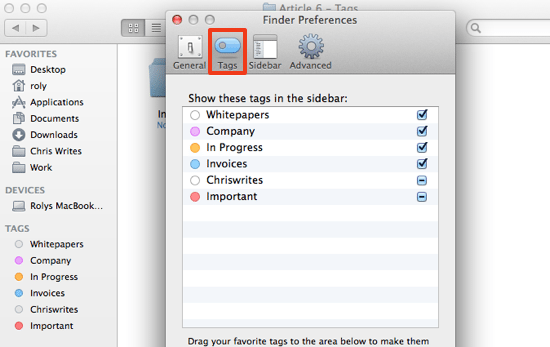
Your new tag should be visible in the list (with no colour assigned) as well as a checkbox to indicate whether it will be displayed in the sidebar. The sidebar lists all recent tags automatically, but you can manually choose the ones you want to appear from this preferences panel. You can also move tags into the desired order and assign a colour.
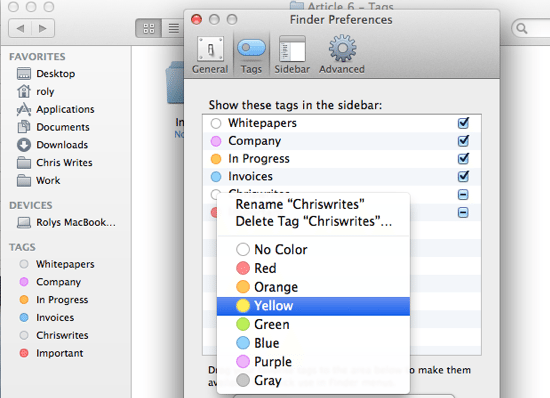
To change a Tag’s colour, right-click the Tag and then choose the desired colour as shown below – in this case I’ve made it yellow. Note that there are only 8 colours to choose from.
You can repeat this process to add as many tags as you want, with any colour desired. In this case we’ll create a new folder called “Important Docs” and assign both the Chriswrites and Important tags to the folder. While we’re at it, we may as well assign In Progress to the Images folder as well.
We now have two folders in our Finder window tagged as follows:
1. Images: tagged Chriswrites and In Progress
2. Important Docs: tagged Chriswrites and Important
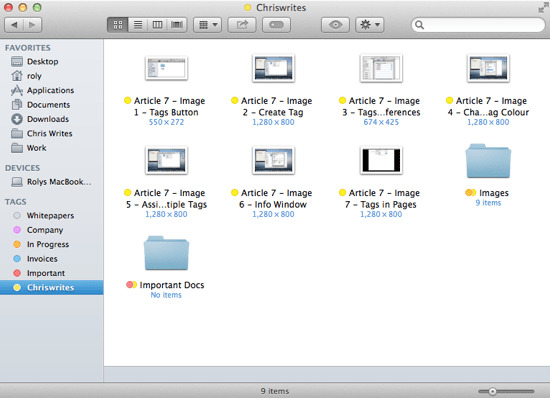
The Finder window now looks like this:
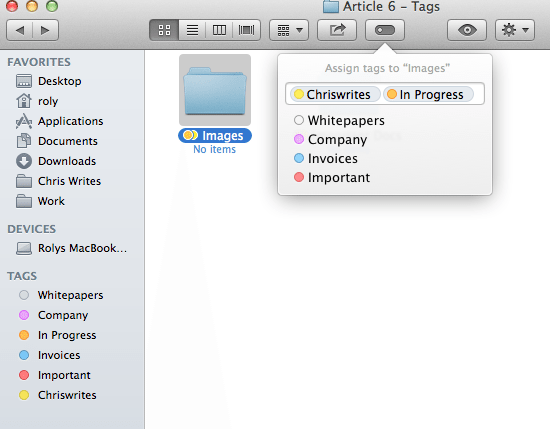
Every item that has been tagged is displayed with a small coloured circle corresponding to the Tag colour.
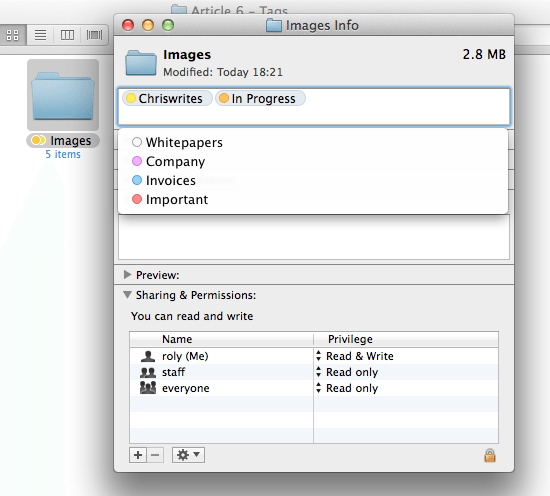
There’s also another way to assign Tags in Finder. Use Cmd-I open an Info window for any selected item. At the top you’ll see any Tags assigned to that item – they can also be added / deleted here by clicking on the empty space (where it says “Add Tags…” when none have already been assigned at the top of the window. Just starting typing to add a new Tag or select from the pop-up list.
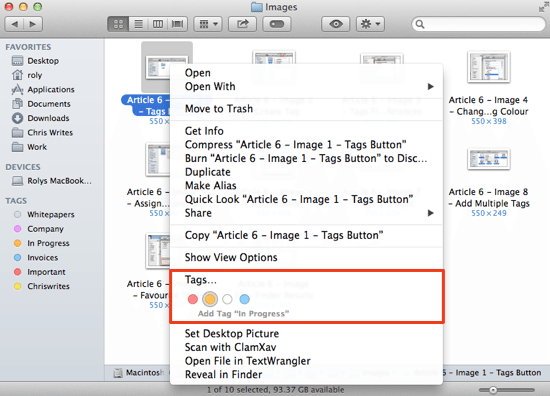
It’s also possible to right-click on any item in Finder to open the context-menu, and select any Tag from the Tags section.
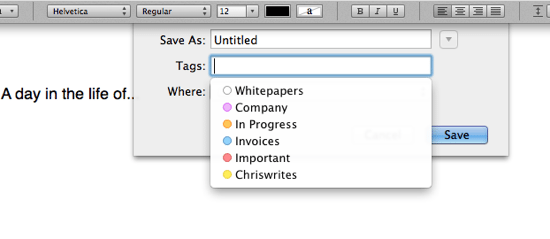
In terms of adding Tags, it’s also possible to tag iWork documents saved on your Mac or iCloud. In Pages for example, when saving a new document, a Tag field is shown that lets you assign a new Tag or choose from an existing one.
Having just two folders tagged isn’t all that useful, so I’m going to tag all the images in my special Chriswrites Images folder with the Chriswrites tag (so I can find them easily later on). Once again, highlight all the items you want to select (e.g. just left-click the mouse in the Finder window and drag to select all the items) and then hit the Tags button. Now choose any Tag from the list.
Mavericks also allows you to create ‘favourite’ Tags, that appear by default on Finder menus and within applications. Go back to the Finder Preferences under Tags, and you’ll notice an empty section at the bottom and some help about dragging Tags to the favourites list – just drag one of your new tags to that list.
Finding your tagged files
Now that we’ve got some items tagged, let’s use them to find some of the files on our Mac.
Next, simply click any of the Tags which are visible in the Finder sidebar to view only those items – you’ll instantly see every item with the particular Tag you’ve assigned. And if you’ve assigned more than one Tag to an item, you’ll see all the relevant colours displayed just to the left of the file or folder as a small coloured circle.
You can see in the screenshots that I already use several Tags day-to-day – for things that are important or in progress, company documents, etc. The Tags feature really has become indispensable – I no longer need to remember exactly which folder I’ve put things in, and while Spotlight also lets you find documents quickly, sometimes it can be more convenient and useful to view them using Tags. Thanks to Tags, finding and organising your files has just become that little bit easier in Mavericks.





Ronald, I really like this article, lots of great info on tags. I have an additional question though! I want to DELETE tags form my list. I have some errors and duplicates and some I just want to rename now that I have a better handle on using tags!! Can you help???
Hi Lindy, just go to finder > preferences and choose the Tags menu. You can select to rename or right click to delete or change tag colour. Heres another post on a related topic which may help : https://www.chriswrites.com/add-tags-finder-menu-quick-access-osx-mavericks/