There’s many areas where a Mac has an advantage over the average smartphone, most notably when it comes to screen and keyboard size. However, some of the most popular mobile apps simply aren’t available for macOS.
You may spend a good chunk of your days scrolling through the Facebook and Twitter apps on your mobile phone, but there’s no (official) macOS equivalent to these popular mobile applications.
If you have a favourite website, then on macOS you’ll either need to bookmark its URL or leave that website open in a tab – and neither of these solutions can compare to a dedicated app!
But just because your favourite website isn’t available as a macOS application, doesn’t mean you can’t create one! In this article I’ll show you how to use the Fluid app, to quickly and easily create a standalone Mac application from any website.
Download and install Fluid
You can download Fluid for free, however if you enjoy using it then you may want to consider purchasing a Fluid License ($5), which unlocks some additional features.
Download the latest version of Fluid, then unzip the file and launch the resulting app.
If your Mac refuses to open this application, complaining about it being “downloaded from the Internet,” then:
- Select the ‘Apple’ icon from your Mac’s menu bar.
- Navigate to ‘System Preferences… > Security & Privacy.’
- Make sure the ‘General’ tab is selected.
- Click the little padlock icon in the bottom-left and enter your admin password.
- Find the warning that Fluid was blocked from launching, and then click its accompanying ‘Open Anyway’ button.
You should now be able to launch Fluid without any problems.
Turn your favourite website into an app
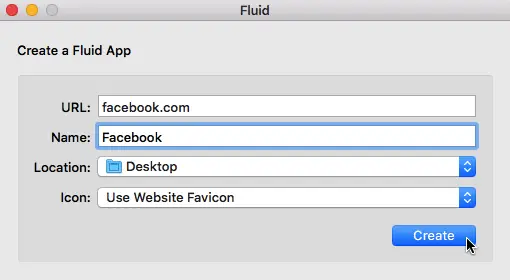
Fluid’s user interfaces makes it easy to create an application from any website or web app of your choosing.

To create an app using Fluid:
- Enter the URL of the website or web application in question.
- Give your app a name.
- Choose the location where this app should be created, for example on your Desktop.
- By default, Fluid uses the URL’s favicon, which is usually the website’s logo. If you’d prefer to use a different icon instead, then open the ‘Icon’ dropdown, select ‘Other…’ and then choose an image from your hard drive.
- When you’re happy with your settings, click the ‘Create’ button.
Once your application has been created, open a Finder window and navigate to the location where you opted to store this application – you should see a new addition!

Give this icon a click, and it’ll launch the website in a new window.
Get the most out of your new Fluid app
The applications you create using Flutter, function just like regular applications, so you may want to consider:
1. Launch the app at login
If you plan to have this app running in the background, then why go to the effort of launching it manually? You can set the app to start automatically, as soon as you log into your user account:
- Click the ‘Apple’ logo in your Mac’s menu bar.
- Navigate to ‘System Preferences… > User accounts.’
- In the left-hand menu, select your user account.
- Click the ‘Login items’ tab.
- Click the little padlock icon in the bottom-left corner and enter your admin password.
- Give the little ‘+’ icon a click.
- Navigate to the application you just created, and then click ‘Add.’
- Back in the ‘Login items’ tab, find your application in the list, and then click its accompanying checkbox.
2. Create a Dock shortcut
By default, you Mac’s Dock is a permanent fixture, so adding an app to the Dock ensures it’s always just a click away.
To add an app to the Dock, simply drag and drop it onto the Dock.


Add Comment