macOS may have been using the San Francisco font since El Capitan, but if Lucida Grande still has a special place in your heart then it is possible to make Lucida Grande your system font on both El Capitan and Sierra.
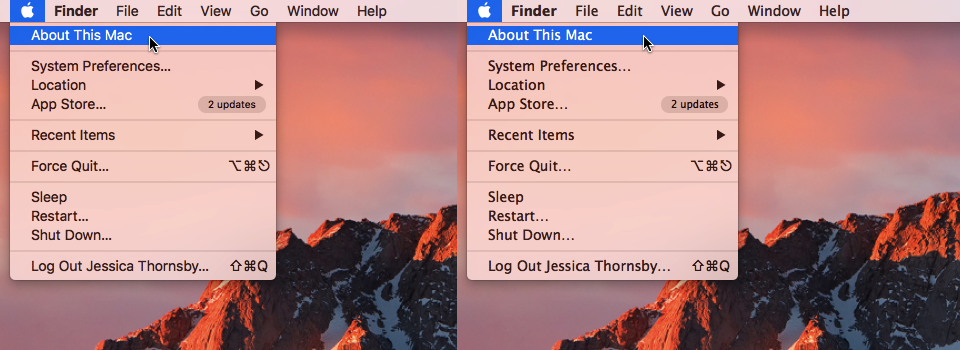
Even if you’ve been using Macs for a while, then it’s possible you may not have noticed when macOS made the shift to San Francisco. This wasn’t a huge change to the user interface, but a side-by-side comparison reveals some subtle differences between the two fonts:
- San Francisco

- Lucida Grande

As you can see, Lucida Grande is slightly bolder, with additional spacing (kerning) between the characters, which can makeLucida Grande easier for some users to read. If you have eyesight-related issues, or are experiencing headaches or eye-strain from using your Mac, then switching to Lucida Grande may help alleviate these issues.
In this article, I’m going to show you how to switch from San Francisco to Lucida Grande (and back again) using the macOSLucidaGrande utility.
Before we start, there’s a few things you need to be aware of. Firstly, this utility typically won’t change every single piece of text that appears across your Mac, so you may still encounter the occasional line of San Francisco, most commonly in dialogue boxes. Secondly, since Lucida Grande isn’t an officially supported font, you may experience some minor user interface issues, for example text can appear squashed when you’re viewing multiple tabs in Safari, or when you’re working with files that have unusually long names.
Create a Time Machine backup
It’s always a good idea to create a Time Machine backup before attempting to make any kind of changes at the system level:
- Open your Mac’s ‘System preferences…’ and select ‘Time Machine.’
- If you haven’t already setup Time Machine, then click ‘Select Backup Disk…’ and follow the onscreen instructions.
- Once Time Machine is configured, Control-click the disc icon that appears in the main Time Machine menu, and then select ‘Back Up Now.’
Switch to Lucida Grande
You can change your system font with the click of a button, using the macOSLucidaGrande utility:
- Head over to macOSLucidaGrande’s GitHub page and download the latest version as a zip file.
- Unzip this file and double-click the resulting macOSLucidaGrande app.
- If your Mac displays the “macOSLucidaGrande is an application downloaded from the Internet” warning, then click the accompanying ‘Open’ button.
- Once you’ve successfully launched macOSLucidaGrande, switching system fonts is easy – just give the ‘Switch to Lucida Grande’ button a click!
- You’ll need to reboot your Mac for this change to take effect, so reboot your Mac now, and once it restarts it’ll be using the Lucida Grande font.
If the font hasn’t changed, then you may need to temporarily disable System Integrity Protection (SIP) and run macOSLucidaGrande again. Note the word temporarily – SIP is an important service that helps protect your MacBook from malware, so if you do ever disable SIP then it’s crucial you re-enable it as soon as possible.
To disable SIP:
- Boot into Recovery by restarting your Mac and holding the ‘Command-R’ buttons until you see the Apple logo and progress bar.
- Once you’re in Recovery mode, open the ‘Utilities’ menu.
- Select ‘Terminal’ and enter the following command:
csrutil disable
- Exit recovery mode and restart your Mac as normal.
- Run the macOSLucidaGrande app again.
- Reboot your Mac.
- Regardless of whether macOSLucidaGrande has managed to change your system font or not, you must re-enable SIP straight away, so boot into Recovery, open the Terminal and run the following command:
csrutil enable
Still struggling with your user interface?
If you’re still struggling to read some of your Mac’s text, or continue experiencing headaches and eye-strain, then it may help to decrease the screen’s resolution:
- Open your Mac’s ‘System preferences…’ and select ‘Displays.’
- Make sure the ‘Display’ tab is selected.
- Hold the ‘Option’ key on your keyboard while clicking the ‘Scaled’ button. This opens a new dropdown menu containing different resolutions.

Spend some time experimenting with different resolutions, to see whether this makes your Mac’s text any easier to read.
Switch back to San Francisco
If switching to Lucida Grande makes you realise that you actually prefer San Francisco after all, then don’t worry: macOSLucidaGrande only adds a patched version of the Lucida Grande font to your Mac’s ‘Fonts’ folder, rather than replacing or modifying the San Francisco font, so it’s easy to reverse this change:
- Launch macOSLucidaGrande.
- Click the ‘Switch to San Francisco’ button.
- Reboot your Mac.
If this doesn’t work, then you can switch back to San Francisco by restoring a previous Time Machine backup.


Add Comment