Printers are notorious for never working when you need them.
If you experience a sinking feeling, every single time you need to print something, then this article is for you! I’ll be sharing all the different tricks, tips and fixes that can help you bring a misbehaving printer back into line.
To help resolve your problem as painlessly as possible, I’ll be starting with the easiest and most common fixes first, before moving onto more obscure and complex techniques. By working your way through the following list, you should be able to get your printer to play nicely, with the minimum amount of fuss and effort.
Rule out the obvious
Printers seem to have a knack for getting under people’s skin!
If you’re just about ready to throw your printer out the window, then take a deep breath and make sure you’ve ruled out all the easy fixes first. Some of these fixes may seem painfully obvious, but they’re also easy to overlook – especially when you’re not thinking clearly!
Start by making sure your printer is plugged into a working power outlet, and check that the printer is switched on. You should also make sure the printer is connected to your Mac securely. If in doubt, then unplug the cable in question and then reattach it firmly, to see whether this resolves your problem.
You should also try restarting your printer, and then restarting your Mac. Technology can be temperamental, so when something isn’t working correctly, switching it off and then switching it back on again is always worth a shot!
Is there an error message?
Your printer may already be trying to tell you what’s wrong!
If your printer has a physical control panel, then check whether it’s displaying an error message, for example it might be complaining about a paper jam, or low ink levels.
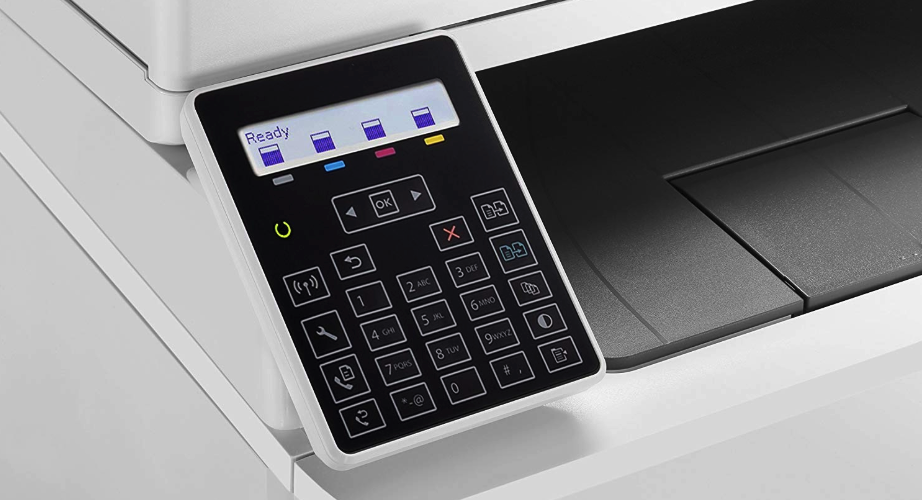
Even if your printer doesn’t have a physical status panel, it’s still worth shuffling your windows and apps around, to see whether an error message has quietly opened in the background.
Ideally, an error message will provide all the information you need to diagnose, and fix whatever problem you’re currently experiencing. However, occasionally you may encounter an error message that’s vague, confusing or simply features an error code with no further explanation. If an error message leaves you scratching your head, then try entering all of its text into your favourite search engine, as this will often uncover additional information that can help you make sense of the mysterious error message.
Is there a paper jam?
Make sure your printer has enough paper and that it’s loaded correctly. Just be aware that with some printers, the paper may look like it’s loaded correctly, when in reality it isn’t quite slotted into place. If in doubt, remove the paper from the printer and then reload it carefully.
You should also check there isn’t any paper jammed inside the printer. Depending on your printer, this may simply be a case of glancing at the paper tray, or you might need to remove the printer’s casing, just to make sure there’s no paper lodged inside your printer.
Running low on ink?
Printers always seem to run out of ink at the worst possible moment – and the sudden lack of ink doesn’t always make sense! Your printer may have stood idle for months, but when you come to print a document you discover that your printer is somehow completely out of ink.
Frustratingly, even if you want to print a black and white document, some printers may refuse to print anything unless there’s ink in all of its tanks, including the colour tanks. It may make zero sense for your printer to demand an injection of magenta when you’re just trying to print a black and white document, but if your printer is demanding magenta, then you’ll need to give it some magenta!
To check whether your printer’s ink levels might be to blame:
- Select the “Apple” logo from your Mac’s menu bar.
- Navigate to “System Preferences… > Printers & scanners.”
- Make sure the “Print” tab is selected.
- In the left-hand menu, select the printer that you want to examine.
- Select the “Options & Supplies” button.
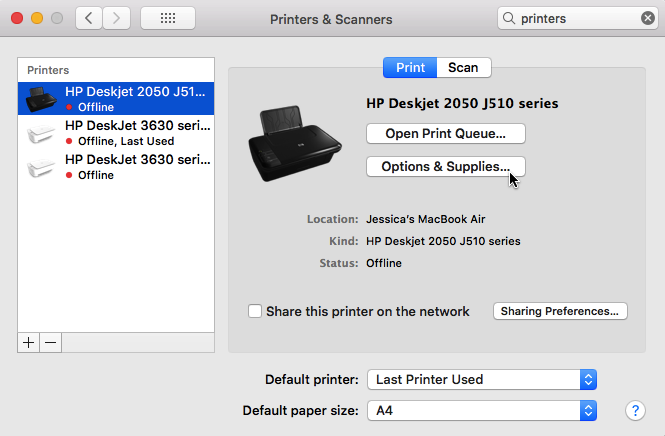
- Choose the “Supply levels” tab. You should now be able to see how much ink is in each of your printer’s tanks.
Alternatively, if your printer has a built-in display, then you may be able to check the current ink levels simply by glancing at your printer.
Check your print queue
If you’ve been trying to print for a while, then you may have inadvertently created a queue that’s causing your printer to buckle under the pressure. Alternatively, if you’ve been clicking around in frustration, or have a particularly buggy printer then you may have accidentally paused one or more tasks in your print queue, which is preventing your printer from moving onto the next task.
You should be able to check your print queue, by selecting your printer’s icon in the Dock. Alternatively, if your printer doesn’t have a presence in the Dock, then you can access its print queue via the System Preferences app:
- Select the Apple logo from your Mac’s menu bar.
- Navigate to “System Preferences… > Printers & Scanners.”
- Select the “Print” tab, if it isn’t already selected.
- In the left-hand menu, choose the printer that you want to examine.
- Select the “Open Print Queue…” button.
Once your print queue is visible onscreen, you can check whether any jobs are paused, or whether they’ve caused an error. If a task is paused, then select that task and click its accompanying “Resume” or “Start” button.
If your print queue has got out of control, then removing one or more items from the queue may resolve your printer problems. Select each item that you want to remove, and then click its accompanying “X” icon.
After editing your print queue, there’s a chance that your printer may suddenly start printing normally; if it doesn’t, then try restarting your printer manually, as this may force your printer to recognise the changes you’ve just made to the print queue.
Wireless printer? Make sure you’re on the same network!
If your printer is wireless, then check that it’s connected to the same Wi-Fi network as your Mac.
If you need to print a document right now, then one potential workaround is to try connecting your wireless printer to your Mac using a physical cable. You may discover that your “broken” wireless printer suddenly starts working correctly as soon as it’s physically connected to your Mac! This may not be a permanent solution, but it can be a real life-saver if you need to quickly print some tickets or a booking confirmation, before rushing off to catch the last train of the day.
Try Diagnostic Functions
Occasionally, you may need to dig a little deeper and perform diagnostic functions, such as cleaning your printer’s headers.
Although this process can vary between different models, you’ll typically find your printer’s diagnostic functions in the System Preferences:
- Navigate to “System Preferences… > Printers & Scanners.”
- Make sure the “Print” tab is selected.
- Choose your printer from the left-hand menu.
- Select the “Options & Supplies” button.
This should open a new window containing various options; look for any setting that features the words “Utility” or “Diagnostics” as this will usually contain your printer’s diagnostic options.
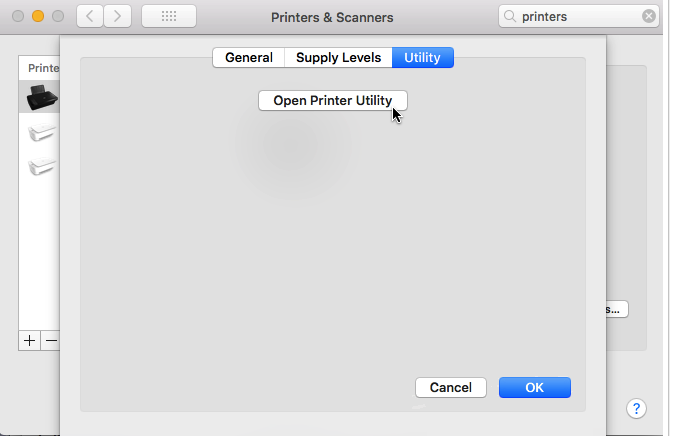
If you’ve explored “System Preferences…” and can’t find any diagnostic functions, then try launching any printer-specific software that you’ve installed on your Mac. Alternatively, check your printer for any physical buttons that relate to diagnostic functions, such as a “Clean Printer” button.
Update your printer drivers
If your printer’s drivers are out of date, then it’s possible the issue you’ve encountering has already been fixed in a subsequent update.
To make sure you’re up to date with your printer drivers:
- Launch the App Store, either by selecting its icon in your Dock, or by launching a new Finder window and navigating to “Applications > App Store.”
- In the App Store, select the “Updates” tab.
- Check the list of available updates for anything printer-related. If you spot a relevant update, then select its accompanying “Update” button.
Re-add the printer
If you’re using a wireless printer and have recently changed your network configuration, then you may get positive results by removing your printer, and then re-adding it.
- Navigate to “System Preferences… > Printers & Scanners.”
- Make sure the “Print” tab is selected.
- In the left-hand menu, select your printer.
- Select the little “-” button; this printer should now disappear from your list.
- To re-add the printer, select the little “+” button and then follow the onscreen instructions. If “System Preferences” is struggling to detect your printer, then check that it’s connected to your Mac via the correct cable, or that it’s connected to the same Wi-Fi network, if you’re attempting to re-add a wireless printer.
Ask for help!
If you’ve tried all of the above, and your printer is still refusing to play nicely, then it may be time to ask for help.
You can reach out to the printer’s manufacturer directly, or solicit some advice from the community, for example you might post a comment on a public forum, or a Facebook group that’s related to your model of printer.
Regardless of whether you contact the manufacturer or opt for community support, you’ll need to know your exact make and model of printer.
If it’s been a while since you purchased this item and can’t quite remember its exact model number, then you’ll often find this information stamped on the printer’s casing, although you may need to unplug the printer and turn it upside down, in order to locate the make and model number. Alternatively, you should be able to find the model information on the box or manual that came with your printer. If you ordered the printer online, then you may also find the necessary information on your email invoice, or in your order history, for example the order history associated with your Amazon account.
Whether you post your problem to a public forum or email the manufacturer privately, it’s important to provide as much information as possible. In particular, you should list all the steps you’ve already taken to try and fix the problem – after all, the last thing you want is to wait days for a response, only to then receive an email recommending all the fixes you’ve already tried!
Reset the printing system
If you’ve tried everything, and are still struggling to print, then as a last resort you can try resetting the printing system. This will remove all the customisations you’ve made to your printer, including all your presets, for all the printers you’ve registered with your Mac. If you use multiple printers, then you’ll need to re-add each printer individually, following the printer reset, so you should typically only reset the printing system as a last resort.
To hit that reset button:
- Navigate to “System Preferences… > Printers & scanners.”
- Make sure the “Print” tab is selected.
- Control-click the left-hand menu and, when prompted, select “Reset printing system…”
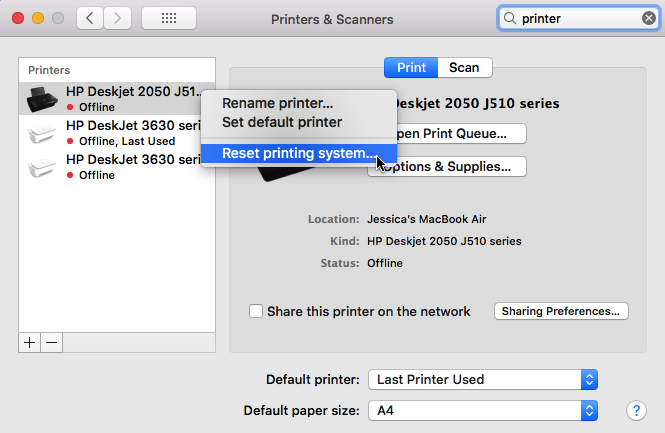
- Read the onscreen warning and, if you’re happy to proceed, then click “Reset.”
Once the system has been reset, you’ll need to re-add your printer:
- Navigate to “System Preferences… > Printers & scanners > Print.”
- Click the little “+” button.
- Follow the onscreen instructions, to add your unique make and model of printer.




Add Comment