With the ever-growing popularity of digital downloads and content-on-demand (iTunes, Spotify, Netflix, Amazon Prime, and YouTube to name just a few) physical CDs and DVDs are rapidly becoming a thing of the past.
Unsurprisingly then, built-in optical drives are no longer a standard feature on many modern laptops – and MacBooks are no exception.
While this does help to create ultra-thin, ultra-light laptops, it does present a problem if you ever want to play a CD, DVD or Blu-ray on your ultra-thin, ultra-light laptop. For example, maybe you want to watch a movie you’ve purchased in a physical format, rip a CD to iTunes, or you don’t currently have an Internet connection and so accessing your Netflix or Spotify accounts are out of the question.
In this article, I’m going to share several ways that you can play DVDs, CDs and Blu-rays on a Mac that doesn’t have anything that even resembles a disc drive.
Use an External Optical Drive
Just because your Mac doesn’t have a built-in SuperDrive doesn’t mean you can’t add one.
Both the Apple USB SuperDrive and MacBook Air SuperDrive are compatible with all Macs made after 2008, but there’s also a wide range of non-Apple CD and DVD drives out there that are typically much cheaper, and will work with most MacBooks (just make sure you check the drive’s exact specifications before making a purchase).
Once you’ve attached your external drive to your Mac, you can use it in exactly the same way as a built-in optical drive: simply insert the DVD or CD into the SuperDrive, and the relevant media-playing app should launch automatically.
An external SuperDrive is a quick and easy way of playing physical discs on your Mac, but if you regularly use your Mac in more than one location, then you may not be too keen on carrying an external drive around with you. One solution is to use the SuperDrive to rip this content to your hard drive, using a tool such as HandBrake. However, before ripping any content you should always check the copyright information and, if required, the laws regarding ripping copy-protected content in your current location.
If you find yourself copying lots of large media files to your hard drive – such as whole TV series or full-length movies – then you may want to invest in a USB drive or SD card where you can store these files externally, rather than cluttering up your hard drive.
Use Remote Disc
If you have access to a second Mac that does have a built-in optical drive, then it is possible to insert a DVD or CD into this Mac, and then access the disc on the Mac that doesn’t have the built-in drive, using a feature known as Remote Disc.
You can also use Remote Disc to access a CD or DVD that’s inserted into a Windows computer, by installing the DVD or CD Sharing Program to your Windows PC.
If you’re going to use a Mac or Windows computer as a stand-in disc drive, then there’s a few restrictions you need to be aware of. Firstly, both computers must be on the same network, and secondly you cannot use Remote Disc to access copy-protected DVDs. If you do want to access a copy-protected DVD on a Mac that doesn’t have a built-in drive, then you’ll need to purchase an external SuperDrive.
To access a disc from another Mac:
- On the Mac that does have the optical drive, select the Apple logo from the toolbar and then select ‘System Preferences… > Sharing.’
- Click the little padlock icon, and enter your username and password when prompted.
- Select the ‘DVD or CD Sharing’ checkbox.
- For added security, make sure you select ‘Ask me before allowing others to use my DVD drive.’
To setup DVD and file sharing on a Windows PC:
- Install the DVD or CD Sharing Update 1.0 for Windows.
- Open the Control Panel, and select ‘Hardware and Sound.’
- Select ‘DVD or CD Sharing Options.’
- Enable the checkbox for ‘DVD or CD Sharing.’
- Select ‘Ask me before allowing others to use my DVD drive.’
Once you’ve enabled DVD or CD Sharing on your Mac or Windows PC:
- Insert the disc into the optical drive.
- Double-check that both computers are on the same network.
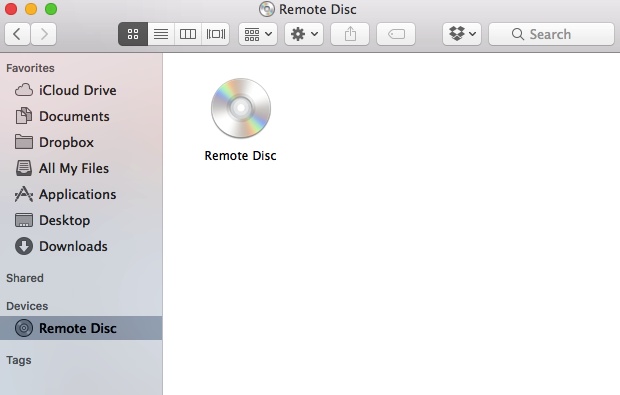
- On the Mac that doesn’t have the optical drive, open a new ‘Finder’ window.
- Select ‘Remote Disc’ from the left-hand menu.
- Your Windows PC or Mac should appear in the Finder window; double-click it and then select ‘Connect.’

- Assuming that you selected the ‘Ask me before allowing others to use my DVD drive’ checkbox, you’ll be asked to approve the connection on the computer that does have the optical drive.
You can now enjoy your chosen CD or DVD on your Mac, as though it does have a built-in disc drive.


Add Comment