Adding a password to your Mac is essential for helping to keep your sensitive files and personal information safe from prying eyes, but what happens if you forget or lose this password? Does it mean you can never log into your Mac again?
Even if you haven’t password-protected your Mac’s login screen (and if you haven’t, then you really should) every Mac has an admin password, and there’s a wide range of tasks that require you to enter this password. Whether it’s installing, deleting or changing important apps or files; making changes to your system settings; or updating to the latest version of macOS, sooner or later you’re going to have to enter your admin password. As soon as you realise that you can’t remember your admin password, you should take steps to recover it – even if you don’t need it right now.
Regardless of whether you’ve lost your login password or your admin password (or whether you use the same password for both tasks) there’s several ways that you can regain full access to your Mac – so don’t panic!
In this article I’m going to share several techniques that you can use to recover or reset your Mac’s password, including using macOS’ built-in password reset utility.
Note that if you do reset your password, then you’ll need to create a new Keychain file the first time you use this new password – this something I’ll be covering towards the end of this article.
Get a password hint
Hopefully, when you created your admin or login password, you also created a password hint, as this can be invaluable for jogging your memory.
macOS will display the password hint automatically after you’ve entered an incorrect password three times on the login screen, but you can also trigger this hint manually by clicking the little ‘?’ icon that appears alongside the password field.
If you’re struggling to remember your admin password:
- Click the ‘Apple’ logo in the toolbar, and select ‘System Preferences…’
- Select ‘Users & Groups.’
- Click the little padlock icon, which launches the password dialogue.
- Either press the ‘Enter’ key on your keyboard three times, or enter an incorrect password three times, and the hint will appear.
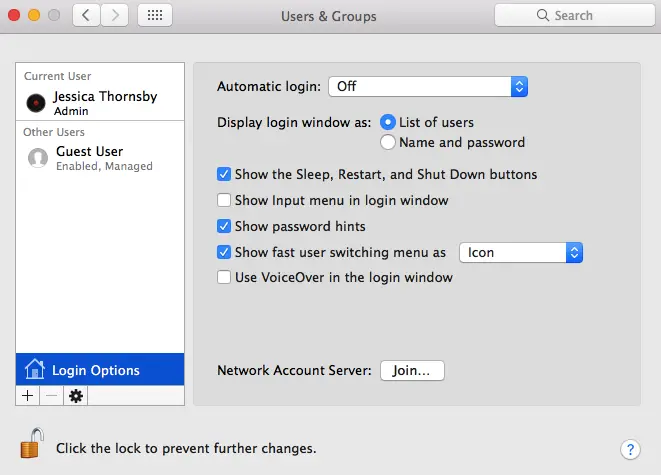
If macOS doesn’t display a password hint, then you either didn’t create one or this feature isn’t enabled on your Mac. If it’s the latter, then bad news: you need to enter your password in order to enable the password hint feature. Clearly, this isn’t something you can currently do, but once you have successfully logged into your account, I’d recommend enabling this feature just in case you ever forget your password again:
- Navigate to ‘System Preferences > Users & Groups.’
- Click the little padlock icon and enter your password.
- Select ‘Login Options.’

- Select the ‘Show password hints’ checkbox.
- Click the padlock icon again to save your changes.
Reset using your Apple ID
Starting with macOS Lion, you can reset your login password using your Apple ID (and if at this point you’re panicking because you’ve forgot the password for your Apple ID, then head over to the Recover Your Apple ID page).
As we’ve already seen, entering an incorrect password three times on the login screen will display a password hint, but you may have noticed that it also displays a ‘Reset using your Apple ID’ popup. If you see this popup, then this indicates that you can reset your password using your Apple ID:
- Select the little arrow icon that appears alongside the popup.
- Enter your Apple ID and password, then select the ‘Reset Password’ button.
- macOS will warn you that resetting your password will create a new Keychain file; if you’re happy to proceed then click ‘OK.’
- Enter your new password, verify it, and then create a password hint. Click ‘Reset Password.’
- Reboot your Mac, and once it restarts you’ll be able to log in with your new password.
If the ‘Reset using your Apple ID’ popup doesn’t appear on the login screen, then you’ll need to use another method of resetting your password. However, having the option to reset your password using your Apple ID can come in handy, so once you’ve regained access to your account you should take a few moments to enable this feature:
- Navigate to ‘System Preferences > Users & Groups.’
- Click the little padlock in the bottom-left corner, enter your password and click ‘Unlock.’
- Select the ‘Allow user to reset password using Apple ID’ checkbox.
Reset using another admin account
Since macOS Tiger, you’ve been able to create multiple admin accounts on the same Mac. If you do have a second account with admin rights, then it’s possible to reset your password by logging into this account:
- Log into the second admin account, or ask the account’s owner to log into their account for you.
- Select ‘ System Preferences > Users & Groups.’
- Click the padlock icon, and enter the password for this admin account.
- In the left-hand menu, select the account that’s due for a password reset.
- Click the ‘Reset Password…’ button.
- In the window that appears, enter a new password and create a password hint.
- Select ‘Change Password.’

- Log out of this account.
- Log into your account using your new password.
Use Recovery Mode
If none of the above methods work, then you can reset your password using macOS’ built-in password recovery utility, which you access via Recovery Mode:
- You can only boot into Recovery Mode when your Mac is starting up, so restart your computer and hold down the ‘Command’ and ‘R’ keys. Release these keys as soon as you see the Apple logo.
- Once you’re in Recovery Mode, you’ll see the ‘macOS Utilities’ dialogue. Select ‘Disk Utility’ and then press ‘Continue.’
- Select ‘Utilities > Terminal.’
- Type the following command into the Terminal:
resetpassword
- Press the ‘Enter’ key on your keyboard.
- Close the Terminal window, and the ‘Reset Password’ dialogue will appear.
- Select your volume hard drive. If you have multiple hard drives, then you’ll need to select the hard drive where your operating system is located, which is usually Macintosh HD.
- Select your account.
- Enter your new password and password hint, and then click ‘Save,’ followed by ‘OK.’
- Restart your Mac by clicking the ‘Apple’ logo in the toolbar, and then selecting ‘Restart.’
Once your Mac reboots, you’ll be able to log into your account using your new password.
While this technique can help you regain access to your Mac, it does mean that anyone can change your Mac’s password simply by booting into Recovery Mode. For many Mac users this is a huge cause for concern, so you may want to consider adding some extra security by enabling FireVault.
FireVault helps to keep your sensitive files and information safe from prying eyes by encrypting the contents of your hard drive, while also adding a lock to macOS’ password recovery utility. With FireVault in place, the only way someone can gain access to your encrypted, password-protected Mac is by booting into Recovery Mode, completely wiping your computer, and then starting from scratch with a fresh install of macOS.
Note that if you do decide to enable FireVault, then it’ll provide you with an automatically-generated recovery key. If you lose this key and forget your login password, then you’ll be unable to reset your password using the Recovery Mode method, so it’s crucial that you make a note of this key.
To enable FileVault:
- Select ‘System Preferences > Security & Privacy > FileVault.’
- Click the little padlock icon and enter your admin name and password.
- Give the ‘Turn On FileVault’ button a click.

- At this point, FireVault will generate a recovery key – you cannot recover this key if you lose it, so either jot it down somewhere safe or print out a copy.
- Restart your Mac, and FireVault will begin encrypting the files on your drive.
Consider using a password management service
If you seem to spend half your life filling in password recovery forms, then you may want to consider storing your login information in a third party password management app, such as 1Password, Dashlane, or LastPass.
Creating a New Keychain
In this article I’ve shown you several ways of resetting a lost password, but whichever method you opt for, your Keychain will still be secured with your previous password.
The first time you log in with your new password, macOS will inform you that it’s unable to unlock your Keychain, and you’ll have the option to either update your Keychain password or create a new Keychain. You can only update your Keychain password by entering your old password, so unless you have a brainwave and suddenly remember your old password, you will need to create a new Keychain file.
Creating a replacement file that’s secured with your new password is relatively straightforward, but the downside is that this Keychain file will be completely empty, so you’ll need to spend some time re-entering all the usernames and passwords that were stored in your old Keychain. This can be a time-consuming process, but unfortunately there’s no workaround!
To create a new Keychain file:
- Open a Finder window and navigate to ‘Applications > Utilities > Keychain Access.’
- Select ‘Keychain Access > Preferences’ from the menu bar.
- Make sure the ‘General’ tab is selected, and then click ‘Reset My Default Keychain.’
- Enter your new password, and Keychain Access will create an empty login keychain that isn’t secured with a password. Click ‘OK.’
- As soon as you enter your password (for example, the next time you log into your account) Keychain will update to use this new password.


Add Comment