In this article, I’m going to show you how to run macOS directly from an external hard drive. Not only does this let you switch between operating systems, but it’s also a great way to experience different versions of macOS without permanently changing anything on your Mac. For example, if your favourite app only runs on a certain version of macOS, or you want to test your project across multiple versions, then an external hard drive can come in handy!
By the end of this article, you’ll know how to run any version of macOS, directly from your external hard drive.
Prepare your external hard drive
In order to install macOS, you’ll need an external drive with at least 12GB of free space.
Once you have a suitable hard drive, the first step is preparing this drive as a GUID partition:
- Connect the external drive to your Mac.
- Open a new Finder window and navigate to ‘Applications > Utilities.’
- Launch the Disk Utility app.
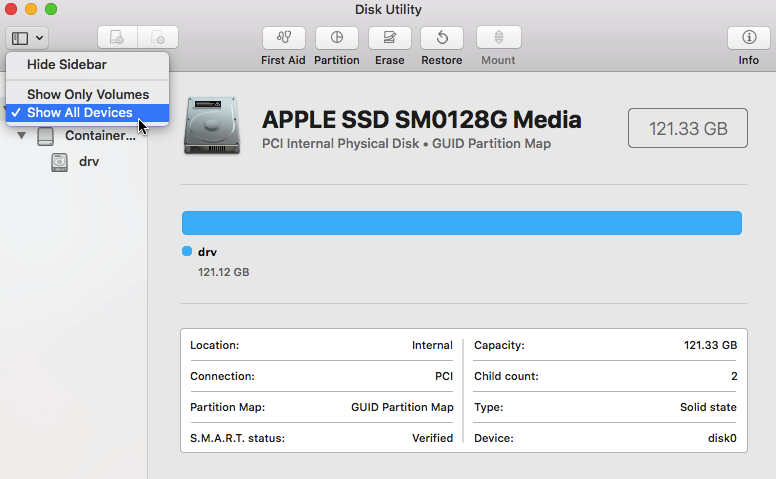
- In the upper-left corner of the Disk Utility app, select the ‘View’ button and make sure ‘Show All Devices’ is selected.

- In Disk Utility’s left-hand menu, select your root drive.
- Click the ‘Erase’ button.
- In the subsequent window, open the ‘Format’ dropdown and choose ‘Mac OS Extended (Journaled).’
- Open the ‘Scheme’ dropdown and choose ‘GUID Partition Map.’
- Give your drive a name.
- Select ‘Erase.’
- Disk Utility will now create the partition and setup the drive, which may take a few minutes. Once the process is complete, click ‘Done.’
Download any version of macOS
The next step, is downloading the installer for the version of macOS that you want to run from your external hard drive.
If you want to install a version of macOS that you previously downloaded from the App Store, then you can just re-download the necessary installer:
- Launch the App Store.
- Select the ‘Purchases’ tab.
- Find the version of macOS that you want to install, and then click its accompanying ‘Install’ button. This will download the installer to your Mac’s ‘Applications’ folder.
If you want to run a version of macOS that you haven’t previously downloaded from the App Store, then things are going to get slightly trickier, as you won’t be able to download this version directly from the App Store.
The easiest workaround, is to try and find another Mac user who’s willing to download the installer for you, as macOS installers aren’t user specific.
Install macOS on your external hard drive
Once you have the necessary files, you’re ready to install this version of macOS to your external hard drive:
- Open a new Finder window.
- Navigate to the installer that you want to use.
- Click to launch the installer.
- Click ‘Continue.’
- Read the terms and conditions, and if you’re happy to proceed, then click ‘Agree,’ followed by ‘Continue.’
- Click ‘Show All Disks,’ and then select your external drive.
- Click ‘Install.’
This version of macOS will now be installed on your external hard drive.
Boot into your new operating system
To boot into this version of macOS:
- Make sure the external drive is attached to your Mac.
- Hold down your Mac’s ‘Option’ key during startup.
- When prompted, select your external drive.
Your Mac will now boot into the version of macOS that’s stored on your external drive. To switch back to your original version of macOS, simply repeat the above steps.


Add Comment