When you send an email, you can usually be confident that your message will be delivered quickly and without any issues – but how do you know whether the recipient has actually opened your message?
There’s plenty of reasons why your unopened email might hang around in the recipient’s inbox for a while – maybe they’re out of office; perhaps they’re travelling and don’t have access to the Internet, or maybe they’ve left the company and no-one is monitoring their inbox.
If you’re sick of wondering whether your email has even been opened, then you can use Apple’s Mail application to request read receipts. Receipts are notifications that are sent when an email is opened, so it doesn’t guarantee that your message has been read, understood, or whether the recipient is ever going to reply – but at least you’ll know that your email has been received safely, and that someone is monitoring this particular inbox!
Apple’s Mail application doesn’t support read receipts out-of-the-box, but in this article I’ll be sharing a few Terminal commands that you can use to add this important piece of functionality to your Mail application.
Enabling Read Receipts with the Terminal
The Mail application doesn’t support read receipts by default, but you can enable this feature using your Mac’s Terminal:
- Open a new “Finder” window.
- Navigate to “Applications > Utilities.”
- Launch the Terminal app.
- Copy/paste the following into the Terminal:
defaults read com.apple.mail UserHeaders
- Press the “Enter” key on your keyboard.
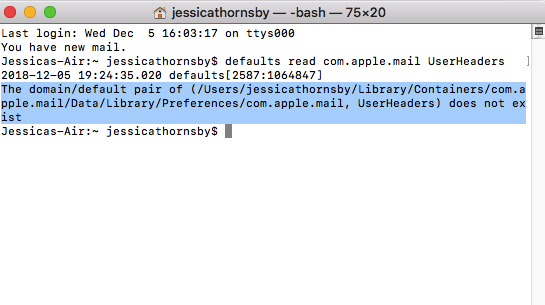
Error: The domain/default pair doesn’t exist
When you enter the “defaults read com.apple.mail UserHeaders” command, you may occasionally encounter the following error:
“The domain/default pair of (com.apple.mail, UserHeaders) does not exist.”

If you encounter this error, then copy/paste the following command into the Terminal, making sure to replace “Name” and “email@address” with your own information:
defaults write com.apple.mail UserHeaders ‘{“Disposition-Notification-To” = “Name <email@address>”; }’
Press the “Enter” key on your keyboard, and then try running the following command again:
defaults read com.apple.mail UserHeaders
Your Mac should now accept this command without any complaints.
Stop receiving read receipts
If you want to disable read receipts at any point, then:
- Launch the Terminal (“Applications > Utilities > Terminal.”)
- Copy/paste the following command into the Terminal:
defaults delete com.apple.mail UserHeaders
- Press the “Enter” key on your keyboard.
Use the iRecepitMail third party app
If you’re not comfortable with Terminal commands, then you can request read receipts using a third party app. iReceiptMail is a popular solution that’s priced at £10.00 for a single user, although a free 7 day trial is available, so you can try before you buy.
- Head over to the iRecepitMail website.
- Select “Download” to try a 7 day free trial.
- Once the .dmg file has downloaded, launch it and follow the onscreen instructions to install.
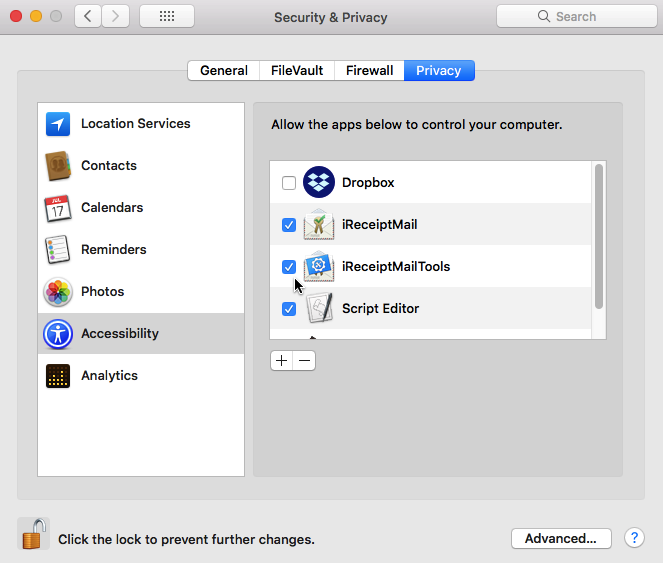
- In order to send read receipts, iReceiptMail requires access to your Mac’s accessibility features, so when prompted click “Open the Security & Privacy preference pane…” This should take you to the appropriate section of your Mac’s System Preferences app.
- Click the little padlock in the bottom-left corner, and enter your admin password.
- Make sure “Accessibility” is selected in the left-hand menu.
- In the right-hand menu, find “iRecepitMail” and “iRecepitMailTools” and then select their accompanying checkboxes.

Relaunch iReceiptMail and you should notice that a new icon has been added to your menu bar. Click the new “iRecepitMail” icon and make sure “Enabled” is selected.
Assuming that you want to receive a read receipt for every email you send:
- Select the “iRecepitMail” icon in your Mac’s menu bar.
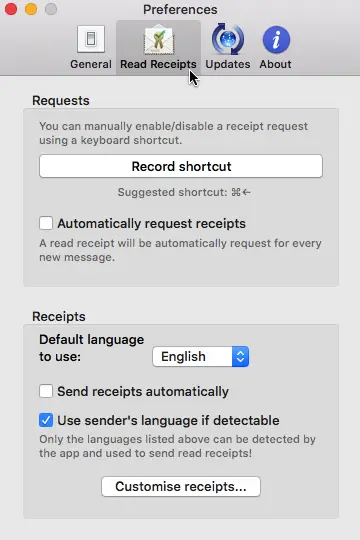
- Select “Preferences…”
- Choose the “Read Receipts” tab.

- Select the “Automatically request receipts” checkbox.


Add Comment