Most of us have multiple apps, tabs and windows open at any one time.
Whether you’re in the bad habit of leaving Facebook open when you’re supposed to be working, or you’re a multi-tasking pro who can juggle several tasks at once, sometimes it can help to have multiple apps visible onscreen.
macOS has a built-in Split Screen mode that divides your screen vertically between two applications, but this is the only Split Screen setup that macOS offers out-of-the-box. What if you want to split your screen horizontally? Or perhaps you have three, or even four apps that you need to keep an eye on?
In this article, I’ll show you how to use the free Spectacle app, to quickly and easily arrange multiple windows, either at the click of a button or using a simple keyboard shortcut.
Screen Management Made Easy
Spectacle is a free application that you can use to create screen configurations that would be difficult (if not impossible) to achieve using macOS’ built-in features.
To get started with this app:
- Head over to the Spectacle website, and download the latest version. Spectacle is free to download, but if you enjoy using this app then you should consider donating to the developer – you’ll find a PayPal link at the Spectacle website.
- Once the file has finished downloading, unzip it and launch the Spectacle application.
- Spectacle will start by requesting access to your Mac’s accessibility features; when prompted, click “Open System Preferences.”
- In your Mac’s System Preferences window, click the little padlock icon in the bottom-left corner and enter your username and password; click “Unlock.”
- Make sure “Accessibility” is selected in the left-hand menu.
- In the right-hand menu, find “Spectacle” and select its accompanying checkbox.

- Close the “System Preferences” window.
- Relaunch the Spectacle app; you should now spot a new “Spectacle” item in your Mac’s menu bar.
Resize and reposition windows, with the click of a button
Once Spectacle is up and running, you can use it to instantly move and resize your current window, at the click of a button:
- Select the app, window or tab that you want to adjust.
- Click the little “Spectacle” icon in your Mac’s menu bar.
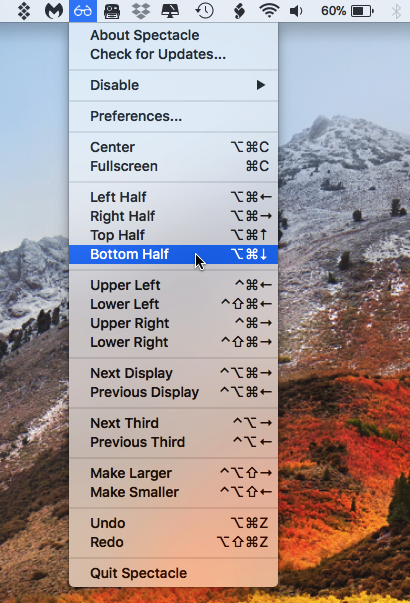
- Select an option from the Spectacle dropdown menu. Most of these options are self-explanatory, for example you can position the currently-selected window along the bottom of the screen by selecting “Bottom Half” or anchor it to the upper-left corner by selecting “Upper Left.”

If you want to view multiple apps in a split screen format, then repeat the above steps to arrange each window, as desired.
Some of the more interesting options include splitting your screen into quarters, using Spectacle’s “Upper Left/Right” and “Lower Left/Right” options.

You can also split your screen into vertical thirds, using Spectacle’s “Next Third” and “Previous Third” settings.
If you have multiple monitors, then you can use “Next Display” and “Previous Display” to relocate and resize windows across your monitors.
If at any point you want to return to the standard display, then either:
- Drag, resize and/or close each window manually, until you’re happy with your screen configuration.
- Select one application, hover over its left-hand corner until you see the “traffic light” icons, and then give the green icon a click.
- Select an application, click the “Spectacle” icon in your Mac’s toolbar, and then select either “Centre” or “Fullscreen.”
Note that closing the Spectacle application will not return your display to its original state.
Creating custom keyboard shortcuts
Once you’ve got to grips with the various Spectacle settings, you may want to speed things up by using keyboard shortcuts. If you open the “Spectacle” menu, then you’ll see that each option has a corresponding keyboard shortcut.
If you’re not a fan of these default keyboard combos, then you can create your own:
- Select the “Spectacle” icon from your Mac’s toolbar.
- Choose “Preferences…”
- Find the shortcut that you want to edit, and then click its accompanying text field.
- When the text field turns blue, press the keys that you want to use as your new keyboard shortcut.
Your shortcut will be saved automatically. If Spectacle refuses to save your changes, then chances are you’re trying to use a keyboard shortcut that’s already reserved by another application, and is therefore unavailable.
Launch Spectacle at login
If you find yourself using Spectacle every single time you boot up your Mac, then you can set it to launch automatically at login:
- Select the “Spectacle” icon in your Mac’s toolbar.
- Choose “Preferences…”
- Select the “Launch Spectacle at login” checkbox.
Clear up your Mac’s toolbar: Hiding the Spectacle icon
If you’ve mastered your favourite Spectacle keyboard shortcuts, then the Spectacle icon may just be taking up unnecessary space in your toolbar!
To banish Spectacle from your Mac’s toolbar:
- Select the “Spectacle” icon.
- Choose “Preferences…”
- Click the little “>” icon in the window’s bottom-right corner.
- Open the “Run…” dropdown menu and select “as a background application.”
- Read the warning, and if you’re happy to proceed then click “OK.”
If you change your mind at any point, then you can restore the Spectacle icon by repeating the above steps, but when you open the “Run…” dropdown, select “in the status menu” instead.


Add Comment