Regardless of whether you’re using an external display, or you’re happy with your Mac’s built-in display, your screen resolution settings determine how large text and images appear onscreen, and also affects the sharpness and clarity of everything you see on your Mac.
Every model of Mac has a default resolution that’s designed to give you the sharpest text and the most detailed images, but if you’re unhappy with these default settings, then you can always adjust the screen resolution manually. In particular, you may want to try decreasing the resolution if spending time in front of the computer is leaving you with headaches or eye-strain, as this will increase the size of the onscreen content and take some of the pressure off your eyes. Alternatively, if you love to multitask, then you may want to try increasing the resolution so that you can fit even more apps and windows onto your screen.
In this article I’m going to show you how to adjust the screen resolution on Retina and non-Retina displays, and how to perfect the screen resolution on any external display you may be using with your Mac.
Things to be aware of
Before we get into the ‘how to,’ it’s important to note that not all screen resolutions will be appropriate for your particular Mac. For example, after switching to a different resolution you may discover that certain apps no longer even fit onscreen, or that strips of empty space appear along either side of the screen. You may need to experiment with a few different resolutions, in order to find the one that’s right for your particular Mac.
It’s also possible that selecting a very high resolution may impact your Mac’s performance, as some graphics cards will struggle to display content at higher resolutions.
How to change your screen resolution on a built-in display
You can increase and decrease the screen resolution in your System Preferences:
- Select the ‘Apple’ logo from your Mac’s menu bar.
- Navigate to ‘System Preferences… > Displays.’
- Make sure the ‘Display’ tab is selected.
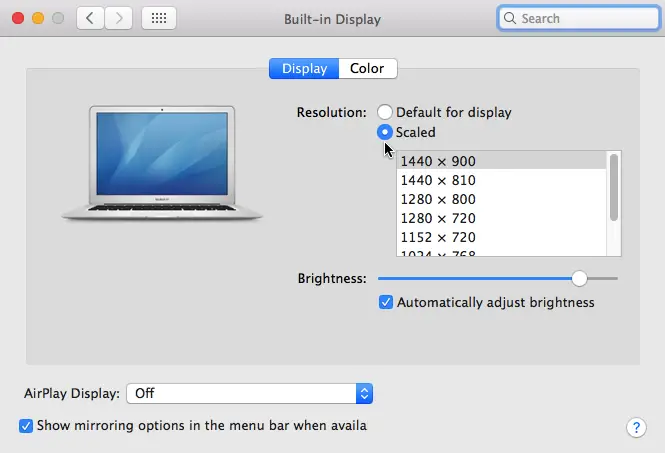
- Assuming you haven’t previously edited the screen resolution settings, ‘Default for Display’ should be selected. Give the ‘Scaled’ radio button a click.
The next steps will vary, depending on whether your Mac has a Retina or a non-Retina display:
1. Changing the resolution on a non-Retina Display
When you select the ‘Scaled’ button, you’ll see various screen resolution options, which will vary depending on your Mac’s technical specs.
You can uncover some additional options, by holding the ‘Option’ key and clicking the ‘Scaled’ radio button again, as I’m doing in the following screenshot.

At this point, you can select any of the available screen resolutions.
2. Changing the screen resolution on a Retina Display Mac
If your MacBook, MacBook Pro, or iMac has a Retina Display, then selecting the ‘Scaled’ radio button will reveal up to five different scaled resolutions for you to choose from, including ‘Larger Text’ and ‘More Space.’
While it currently isn’t possible to set a specific resolution for Macs with Retina Displays, one possible workaround is to attach an external display to your Retina Display Mac. At this point, you’ll be able to set a specific resolution for this external display, which leads us neatly onto our final section.
3. Changing the screen resolution on an external display
If you’re using an external display, then you can specify a separate screen resolution for this display:
- Navigate to ‘System Preferences… > Displays.’
- Open the ‘Optimize for…’ dropdown, and select your external display.
- Hold down the ‘Option’ key and give the ‘Scaled’ button a click.
- Select a new screen resolution from the list.


Add Comment