Everybody who uses a Mac daily strives to become more productive in order to get the most from their computer. Thankfully, the Mac is one of the most user-friendly machines available and Mac OS is geared up to support novice and advanced users alike. Over time, you can’t help but pick up some handy techniques which can save minutes or hours of time every day. In Mac OS X Lion, Apple has also included lots of new features that can streamline your workflow and enable you get the most of your day to day Mac experience.
Here are some tips which could help you become even more productive on the Mac.
1. Lion Gestures
Gestures can be one of the most effective ways to interact with your Mac and most people find them to be very useful indeed. Not everybody loves them though, but those that do find that once they’ve learned the basics, many tasks can be achieved much more quickly. The glass trackpad on MacBooks, the Magic Trackpad and the Magic Mouse are allow accurate gesture recognition much like an iPhone screen, and they are considered unrivalled input devices especially compared with their PC equivalents.
Some gestures such as pinch to zoom are easy to learn and very intuitive. A quick double-tap with 2 fingers in Safari zooms in on the area in question, and swapping desktops in full screen mode is easily done with a quick 3 finger swipe, as well as scrolling backwards and forwards in Safari with a 2 finger swipe left and right. Take some time to learn all the gestures, because it really will improve your Mac experience no end.

2. Keyboard Shortcuts

Keyboard shortcuts are used everywhere on the Mac, and for many users are the preferred way to access the most common functions and application features. In fact, many people prefer not to use a mouse at all – we’ve already described a few related tips in this article.
Keyboard shortcuts enable you to quickly perform tasks such as open and close files, quit applications, cut and paste text, open preferences, swap between browser tabs, switch between fullscreen apps, and hundreds more besides. It’s also possible in Mac OS X to assign custom shortcuts to any menu item in an application (open System Preferences -> Keyboard and select Keyboard Shortcuts).
For most Mac users, keyboard shortcuts are the single most effective way to minimise the time spent looking in menus and allows you to quickly access functions that you use the most.
3. Lion Fullscreen Mode
 With the introduction of fullscreen mode in Mac OS X Lion, the visual clutter and problem of too many open windows has become much less of an issue, especially for MacBook users who need all the screen real estate they can get. Fullscreen mode (which can also be activated by the keyboard shortcut Control + Command + F in most compatible applications) lets you concentrate fully on the application in hand, and although it might seem unlikely to increase productivity, it can actually help you focus more intently on the present task.
To switch between fullscreen applications is also a breeze – either swipe 3 fingers left or right, use Control + left/right arrows, or enter Mission Control and select an app with the mouse from there.
4. Mission Control
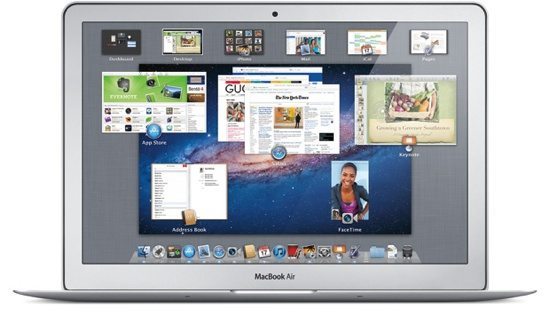
Mission Control in Mac OS X Lion unifies what was previously known as Spaces and Exposé in older versions of Mac OS. The whole concept of application and window management has been rethought, and even though it’s not perfect it really does provide a quick and fairly uncluttered view of all your windows and spaces, grouped together logically in a way that seems to make a great deal of sense. Critics will point out that it’s not possible to arrange spaces vertically as in Snow Leopard (spaces can only be arranged horizontally in Lion), but for most people this isn’t really much of a limitation.
Get to grips with Mission Control and you’ll save time moving between windows, and you’ll also be able to quickly locate the applications and windows that you want to work with.
5. Automator
![]()
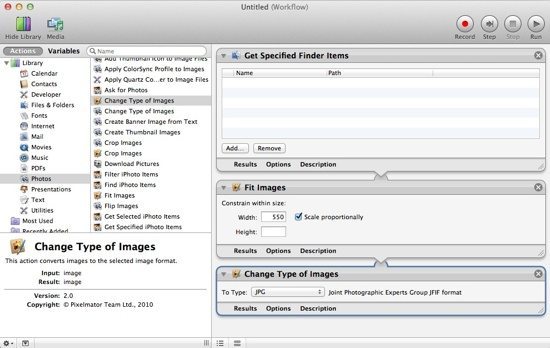
Automator is one of those immensely powerful applications that hardly anyone uses. The majority of Mac users don’t know about it or even realise the power of what it can do.
For example have you ever wondered how to automatically convert a whole folder of images to another format? Or perhaps how to batch rename files with today’s date appended on the end? Automator can do all this and more. It’s basically a graphical front end to AppleScript, and just about every action that can be done in Mac OS can be achieved using Automator.
In Automator, once you’ve chosen some custom actions the workflow can be saved an application or a service which can be run from the Apple menu or the desktop.
Some of the hundreds of things Automator can be used for are:
- Adding and deleting events to iCal
- Renaming, resizing, cropping and manipulating images
- Playing iTunes playlists and adding content to iTunes
- Encrypt ingPDF documents, creating multiple PDFs from one
- Creating Keynote slides, starting slideshows, extracting notes
- Starting the screen saver, burning a disc, running shell scripts or AppleScript
![iCloud Icon]() 6. iCloud
6. iCloud
You might wonder how iCloud can help you to be more productive and speed up your Mac’s workflow, but iCloud can actually save you time by automating common activities such as copying new contacts between your iPhone, Mac and iPad.
For example if you use Reminders and iCal on iOS devices, you’ll appreciate the fact that iCloud keeps everything synchronised so that you don’t have to. Simply turn it on and forget about it.
Almost the same synchronisation functionality can be achieved with iTunes syncing, but iCloud makes the whole thing completely effortless.

![Spotlight Icon]() 7. Spotlight
7. Spotlight
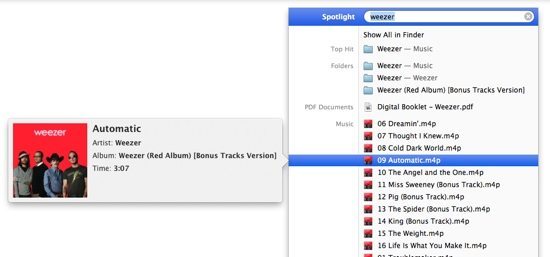
The quickest way to find any item on your Mac is often by using Spotlight, as it has a complete index of every single item on your computer such as files, contacts, music, pictures, movies and much more.
Spotlight can be found in the top right menu bar of your Mac, or accessed using Command + Spacebar from any application. When it opens, just start by typing the name of the item. You can also preview the results immediately in a pop-up window by hovering your mouse over the item.
![Smart folder icon]() 8. Smart Folders
8. Smart Folders
Smart folders can save you a lot of time to find files and other items on your Mac. Smart folders are essentially a kind of virtual folder that automatically updates its content based on the criteria you set. It’s quite important to realise that smart folders do not contain copies of the items but create links to it, so if you delete a file or folder from a smart folder then you’ve actually deleted the original.
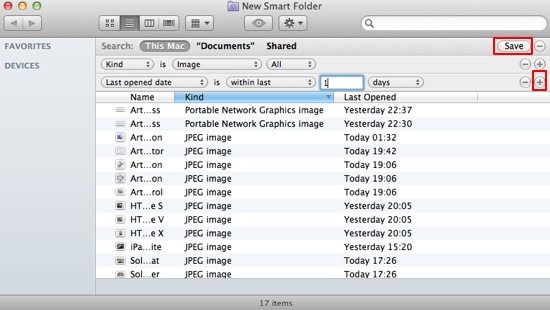
To create a smart folder follow the steps below.
- In a Finder window, select New Smart Folder from the File menu (or the Option + Command + N shortcut). A new window opens up that looks similar to a normal search folder
- Choose the location in which you want to search – there are a few options such as This Mac, Documents or Shared (computers you may be connected to on the network)
- Define the criteria that you want the smart folder to search. Click the add button (the + icon) and then choose from the options that appear. The first option automatically includes “Kind” is “Any”, but you can change this to anything such as movies, music, PDF documents or something else
- Continue to add additional criteria until you’re satisfied that the smart folder will contain the correct items
- Click save in the upper right of the window to save the smart folder in the saved searches library folder inside your Home folder. You can also add it to Finder’s sidebar so you’ve got convenient access to it from any Finder window
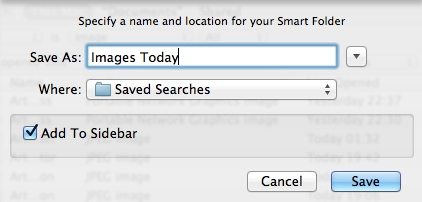
Now the smart folder has been created it will automatically update itself based on the criteria you’ve set, thereby saving you time in future looking for those types of files manually. For example, you might want to create a smart folder that contains any images that have been modified during the last week, or one that contains all files over a certain size.
9. Folder Labels
Folder labels are a simple way to colour your folders and files. For example, you might want to label work-related documents that you’ve completed in green, documents “in progress” in orange and those “not started” in red as shown below. This really comes into its own when you have a very long list of folders that you access frequently and would like to immediately see which ones need attention.
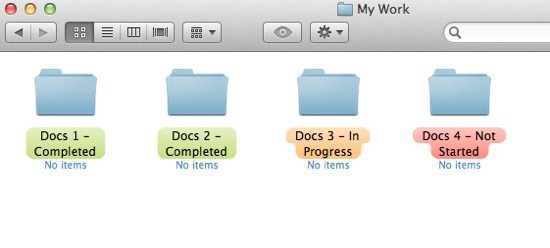
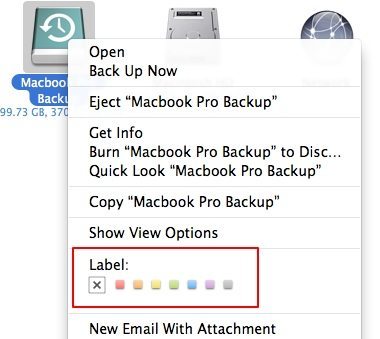
To assign any of the default 7 coloured labels to an item, just right-click the item as pick a label as shown below.
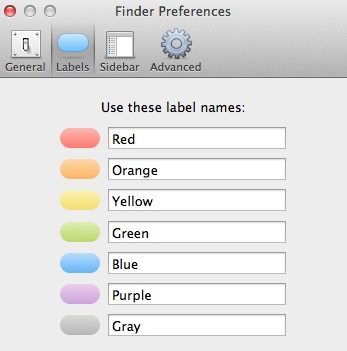
It’s also possible to rename the labels anything you want:
- Open Finder and choose Preferences from the Finder menu, or use the Command + , shortcut
- Go to the Labels tab
- Select a label and enter the new name you want to use
10. Keep Your Mac Running Smoothly
It goes without saying that a smooth running Mac will enable you to get the best out of it. If your system is clogged up with duplicate files, too many unused applications, thousands of bloated application preferences and huge cache files, this will definitely reduce your efficiency if it’s running slowly and keeps freezing. Keeping your computer in optimum condition is therefore a key part of ensuring you can be as productive as possible.
Follow the guidelines and suggestions in some of our related tutorials such as:




Thanks for the post. I didn’t know about color labels before. I even search some time ago for such app. 🙂
For me crucial two things: Pomodoro for time management, and Numi for calculations. I really don’t know how to live without that gems at work.
These are really the best! Thanks for this, Roland!
Like Victor says as well, I am in love with the pomodoro technique and nothing will take that from me while working. But, one thing I love about MAC as well is the folder labels! Just so cute when they have colors! And of course with that, you will get to know same work files under each color category.
Really helpful for me since my profession involves writing. Two thumbs up!